Navigation auf uzh.ch
Navigation auf uzh.ch
In order to use the Voice-over-IP services provided by IFI, you must have your personal user data at hand. You have received this information via e-mail or on a paper. It should look similar to this:
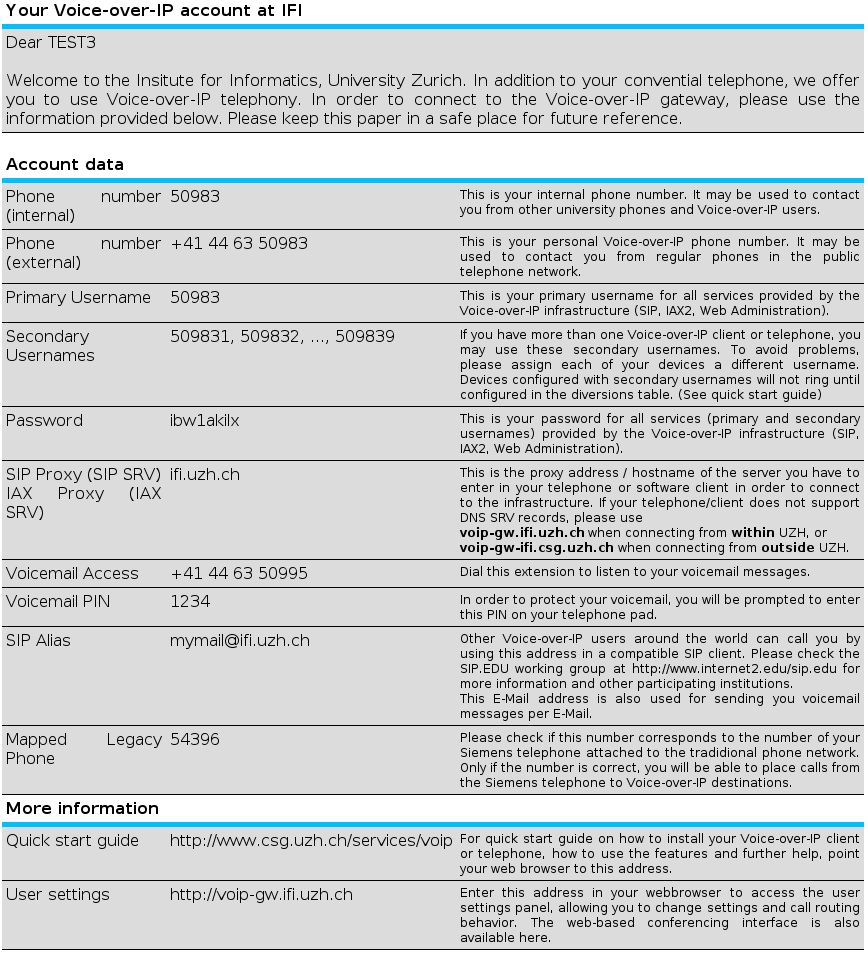
(If you are new to the institute and didn't receive such an Email, please speak to your professor, as well as the responsible person at the Direktionssekretariat (Andreas Corti at the time of writing) in order to obtain an account.)
Configure your SIP client with the following settings:
| User name: | 50983 (example) |
|---|---|
| Password: | ibw1akilx (example) |
| Server: | voip-internal.ifi.uzh.ch (if using from inside the University network), OR voip-external.ifi.uzh.ch (if using from inside the University network) |
There are different ways you can connect to the Voice-over-IP infrastructure.
Of course, using the Siemens telephone provides the easiest way of access to the Voice-over-IP infrastructure, but it is rather complicated to use and does not provide all the features. We recommend using a software client to make your first moves and try out the interesting new features. Using a software client also allows you to take your telephone number to anywhere in the world where you have internet access, even at airports with wireless LAN access. If you prefer the comfort of a real telephone, you may buy a SIP compatible telephone in one of the many computer stores. There are wired and cordless versions available and an increasing number of mobile phones that implement wireless LAN with an integrated Voice-over-IP client.
For a list of software and hardware phones you can use, consult
There are hundreds of different software Voice-over-IP clients available. We cannot test them all, but if they either support the SIP or IAX protocol, they should work. Maybe you are wondering what the difference between SIP and IAX is. While SIP (Session Initiation Protocol) is an open standard, IAX is an open proprietary protocol used by the Asterisk software. Asterisk is the core of the IFI Voice-over-IP infrastructure. While at the current time there are less clients available for IAX, the protocol usually performs better with firewalls and NATs commonly used for broadband internet connectivity at home. If you are having problems with using SIP (no audio), you may try to use an IAX client.
New!Ubuntu Linux comes with the instant messaging/VoIP client Empathy, which works just fine with our system. Likewise, Android's free CSipSimple also works!
The following directions show how to download, install and configure the X-Lite software phone. It is freeware and available for Windows, MacOS and Linux. Other clients may use other names for certain field but will generally have a similar configuration interface.
X-Lite can be directly downloaded from its manufacturers website http://www.counterpath.com
[Note: Unfortunately, we cannot follow the redesign of the
counterpath website with a continuous redesign of this QuickStart Guide,
so the download button may, and probably will look different when you
download the software. At the time of this revision, the download may be
found over Products -> XLite]
http://www.counterpath.com
Click the download button

Download the respective version for your operating system

Install X-Lite by executing the downloaded file. The installation wizard is similar to many other applications. In Windows you can basically click “Next” a few times, having accepted the license.

After the installation has finished, X-Lite will automatically start. If this is not the case, you may find it in the start menu (Windows), applications folder (MacOS) or in the applications menu of your window manager (Linux).
[Note: Like the website, the configuration menus may change in look and feel over time (not unto the time of this revision, though). However, the configuration items should still be present. Please be aware that, of course, you're not bound to XLite in any way... if you find another SIP or IAX2 capable hard- or software which you find easier to configure, you may switch at any time. If you're keen on more in-depth information about VoIP internals as well as available clients, we recommend VoIP-Info.org.]
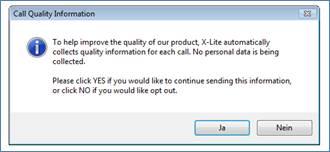
Upon first startup, X-Lite will ask if you want to report quality information to the manufacturer. Decide for yourself if you want this, functionality does not depend on it.
Because there are no user accounts configured yet, X-Lite will present you with the accounts dialog, in order to set one up. Click the “Add” button to do so.

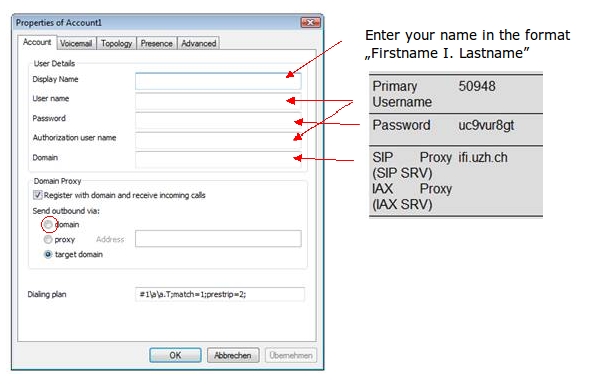
Finally, a dialog box will appear, requesting the user information. This is the information contained in the e-mail or paper mentioned earlier.
In the “Display Name” field, enter your name in the format “Firstname I. Lastname”. Of course, you can also leave out the initials. In the “User name” and “Authorization user name” fields enter your “Primary Username”. In the “Password” field, provide the “Password”. In the “Domain” field enter the “SIP Proxy / IAX Proxy” information. Before clicking outbound, make sure that “Send outbound via” is set to “domain”.
| Please note that you should only configure one SIP client or telephone with your primary username. If you have more than one SIP phone, each user has nine additional secondary usernames available. In the case of the primary username 50948 these are 509481, 509482, …, 509489. The password is the same for all usernames. Phones that are configured with a secondary username will not ring on incoming calls unless they are entered in the diversions table. See the according chapter for more information. |
|
|
|
Because X-Lite is a so called
DNS SRV aware client, it automatically finds the best interface to
connect to the IFI Voice-over-IP infrastructure.
The infrastructure has multiple network interfaces in order
to circumvent certain firewall issues with the university
firewall. If you use a client that is not DNS SRV
aware, you must manually enter the real address of the SIP/IAX
Proxy and change it according to whether you connect from inside
or from outside the university network. As an alternative you can
leave the address for connecting internally and use the university
VPN-client when you are abroad. [Note: this feature had to be disabled due to an incomplete SIP SRV lookup implementation in Asterisk, which would have rendered ENUM lookups from external Asterisk machines very unreliable - and thereby rendering IFI VoIP reachability from the outside unreliable. It will be re-enabled when the implementation is completed. For more information, please consider the Known issues webpage] The proxy address is
|
After you have entered all your data in the dialog box, it should look similar to this:

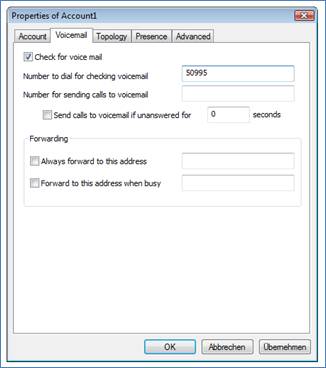
Please go to the “Voicemail” tab now, to enter the access number for voicemail. Enter “50995” in the field “Number to dial for checking voicemail”. Make sure the check “Check for voice mail” is ticked.
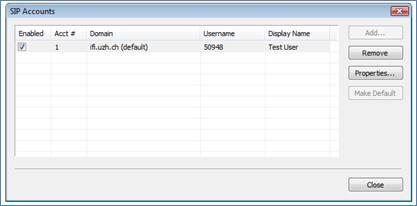
You may now confirm the dialog box with “OK”. Your newly created account should now appear. You may also close the “SIP Accounts” dialog box by clicking on “Close”.
[Note: As pointed out by Robert Stoyan at the time of writing (2008-02-11), XLite has the slight bug of accepting the changes to settings only after closing the configuration window - not after pressing 'OK' or 'Übernehmen']
.
X-Lite should now be ready for use. If everything went well it should display “Ready” together with your username. If an error message is displayed, please double check your configuration settings before contacting the technical staff. At this point your IFI Voice-over-IP account is automatically activated and you may receive incoming calls.

Please make sure that you have configured the audio settings on your computer and have installed a headset if you wish to use one. The volume settings may also be adjusted in X-Lite itself by used the slider-controls on the left and right side for microphone and speaker respectively.
First, lets try to make an outgoing call. Enter the number “50996” in X-Lite by using your mouse or your computer keyboard. Finally, click the green telephone symbol on the left. Upon successful connection you should hear a short beep after which the so called “echo test” is activated. The purpose of this test is to see if you can send and receive audio correctly. Just say something in the microphone and you should more or less immediately hear yourself. If you are done, you may hang up by clicking the red telephone symbol on the right.
Just to be sure, you may now try to call yourself from another telephone and see if everything works fine. Should there be any problems, first double check the sound settings of your computer and verify that the microphone input is enabled. Should you still experience problems, you may contact the admin staff.
That’s it; you have successfully configured your software Voice-over-IP client!
For an explanation of all of X-Lite’s features, please consult the user manual that is downloadable as a PDF on the Counterpath Website http://www.counterpath.com
We cannot give you a general recommendation on what phone you want to buy. Every phone’s configuration interface is different, but the parameters that need to be entered stay thesame. Of course, the labeling of certain settings can differ. Please use the software client configuration tutorial as a guideline and try to adapt it to your phone by consulting your phone’s manual.
We have successfully tested a Cisco 7940/7960 and Grandstream GXP-2000 phone and also a Nokia E61i mobile phone with SIP capabilities to work well.
You can use the Siemens phones to access the Voice-over-IP infrastructure with limited features. The most obvious limitation is that there is no alphanumberical keyboard, allowing you to reach other SIP users.
Access is provided by the special number “50999” you always have to dial first. Immediately after you have dialed this number, the Voice-over-IP system will pick up, issue a short beep and present you with a standard dialtone that additionally provides Voice-over-IP services. As soon as you hear this second dialtone, you may dial the number you want to call. It will take a moment after you have entered the last digit until the call is actually processed, please be patient. If you wait too long between entering the digits, the system may dial too early. In this case you have to repeat the process from the beginning. Also, please note that when using the Voice-over-IP infrastructure you never have to predial a “0” in order to get an external line. Just dial the number, as if you would call from home. Of course you may also dial university internal numbers. When using this “gateway”, your caller-ID presented to the caller will be your Voice-over-IP phone number, not your Siemens phone number.
You may wish to program the “50999” access number onto one of the speed dial buttons of your Siemens telephone. The procedure for programming a speed dial button on a Siemens phone is as follows:
From now on you can access the Voice-over-IP infrastructure by simply touching the speed dial button before lifting the handset.